Shaper's Hoard Keys
![]() Back to Quests
Back to Quests
Contents |
Quest Overview
Gain access to a shaper's hoard for five minutes, and mine all you can!
Start Location: varies
Requirements: Level 1, 15+, or 30+
Quest Starter: Prospector's Corpse
Time Limit: 10 minutes
Repeat Time: 6 days, 20 hours
XP Reward: none
Other Rewards: Mined trait, possible lodestones and tesserae
Related Quests:
Walkthrough
Throughout the world, and very rarely, you may see a Prospector's Corpse in areas where monsters normally appear. This corpse will have one random Shaper's Hoard Key. They have been known to spawn on Osteth, Omishan, Linvak and Arramora. Keys can be dropped, traded, or sold in Curiosity shops. The only requirement to be able to use a key is getting to the continent, so Omishan keys can only be done by level 15+ and Linvak by 30+. Each key corresponds to a Shaper's Hoard, and all 15 are on individual quest timers. Here is the list of locations and the ringway where they're located:
Osteth Crystal: 38.0N 5.5W (Arwic)
Osteth Iron: 25.0N 29.6E (Drudge Citadel, Northeast)
Osteth Silver: 2.6N, 13.8E (Prosper, Eastern)
Osteth Stone: 17.8N 9.7W (Molwirth)
Osteth Wood: 40.5N, 19.5W (Millstone)
Omishan Crystal: 6.1N, 38.3E (Kydi, West)
Omishan Iron: 29.2N, 50.8E (Rakani, nearest lifestone 26.8N 53.2E)
Omishan Silver: 32.8N, 86.6E (Farali, Northeast, The Twins)
Omishan Stone: 15.0N, 88.3E (Vesayen, North)
Omishan Wood: 5.7N, 64.3 E (Lumari, North)
Linvak Crystal: 16.6S, 10.8W (Oriad, West)
Linvak Iron: 26.5S, 29.0W (Stoneshadow, Southwest)
Linvak Silver: 13.2S, 41.3W (Nepeth, Northwest)
Linvak Stone: 2.2S, 31.6W (Winterhollows, Northeast)
Linvak Wood: 9.8S, 17.3W (Thusik, East)
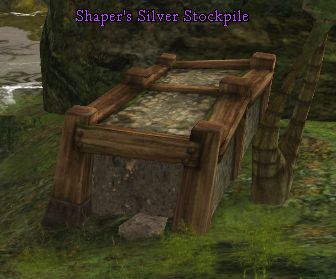
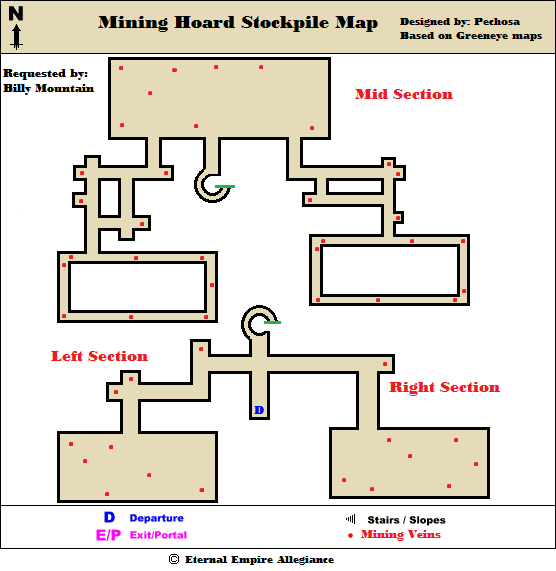
Using the key begins a 10-minute quest. While this quest is active, anybody in the fellowship can click the hoard to enter the dungeon. Entering gives you a 5-minute "buff" which allows you to mine (independent of the 10-minute quest timer). Once that 5 minutes expires, you lose the ability to mine and are portalled out of the dungeon. This mine contains nodes of ore (3 chops each, like a normal node) which are on fixed spawns and two-minute respawn timers. While this can be done solo, the optimal way to do it is with a full fellowship of 9. However, if all 9 run in at once and mine, there won't be much ore to go around. The best way to run this quest with a full group is three groups of three, as follows:
- Divide the fellowship into three groups and one direction each; left, center or right.
- Once the quest timer starts, only Group 1 enters the mine, and each person goes in their chosen direction.
- When the quest timer reads 5:10, Group 2 enters the mine. Group 1 will be getting portalled out around this time.
- When the quest timer reads 0:10, Group 3 enters the mine. Group 2 will be getting portalled out around this time.
Doing it this way allows all nine people to mine for a full five minutes. The directions left, center and right refer to the first room of the mine. When you get portalled in, you can pick one of three directions, and this ensures that three people can mine at the same time without bumping into each other. Some recommended routes follow:
- Left - There will be a tunnel with 3 nodes and a big room with 5. Mine the tunnel and then the big room, and backtrack to the tunnel. There should be 2:15-2:45 left on your mining buff. Wait a few seconds for the first tunnel node to reappear, and then mine the rest of them in order. Total yield: 16 nodes.
- Right - There will be a tunnel with 1 node and a big room with 7. Mine the tunnel and then the big room, and backtrack to the tunnel. There should be 2:15-2:45 left on your mining buff. Wait a few seconds for the tunnel node to reappear, and then mine the rest of them in order. Total yield: 16 nodes.
- Center "Hard path" - This path must be done with no wasted time, so move quickly! Run straight up the circular ramp. Turn right when you enter the big room and ignore most of these nodes for now. Look for a gap in the wall to your right. If a node spawns here (some dungeons vary slightly) mine it and then enter the gap. This tunnel has 5 nodes... mine them all but don't enter the other big room on the other side. Backtrack to the big room where you started. Mine the 6-7 remaining nodes here. There's a gap in the left wall just like there was on the right. Enter this, and mine the 5 nodes in this tunnel. Go into the big room on the other side, immediately turn right, and mine the two nodes which spawn next to each other. Total yield: 19-20 nodes
- Center "Easy path" - Run straight up the circular ramp. Mine the big room's 7-8 nodes, wait for the respawn timer, and do it again. This path is much easier, but you'll get less nodes. It's perfect for working out deals with people in the left or right groups who might want to try the two-floor paths on their side, though. Total yield: 14-16 nodes
- Left/Right two-floor paths - Only run this route if you discuss it with the "center" person in your group first, so it doesn't look like you're stealing the nodes from their path. Best used with center easy path above. The right/left person goes up the center ramp. Don't mine any nodes in the big room. Go left/right immediately and follow the wall until you get to the gap. Only mine this tunnel if you discuss with the center person, otherwise proceed through it until you get to the big room on the other side. Immediately turn right, mine the 2 nodes here. Change direction and run along the edge of the room mining as you go, then jump down and mine the first floor of the big room, too. Best yield possible: unknown.
Other mining tips
- If you're in Group 1 or 2, the path you take will affect where nodes respawn for the groups behind you. Try to do it in some sort of logical fashion so they're not running around playing whack-a-mole on random mines as they pop up.
- If you're in Group 1 or 2, you can sometimes squeeze a third spawn out of some nodes, but resist the temptation to do this as it can disrupt the later groups.
- If you're in Group 3, you can get away with taking these third spawns, and don't have to worry about a group behind you. This lets you get a few extra nodes if the conditions are right.
- If you're in the tunnels, click the dot on radar to select a mine instead of waiting until you turn the corner and see it.
- Sometimes the nodes are invisible, but they can still be selected by clicking their dot on radar.
- You can stand a slight distance away from a node and still chop it... but if you're too far, you run up to it, get an error message, and have to reclick. Learn this "sweet spot" and save yourself precious time.
- The upper floors of the left and right side are accessed through the center. Each dungeon varies slightly, but they all have a tree or some other obstruction that you can't jump around without falling to the lower floor. Running into it may cause backtracking and wasted time, so keep an eye out for it if you're mining the top floor.

